



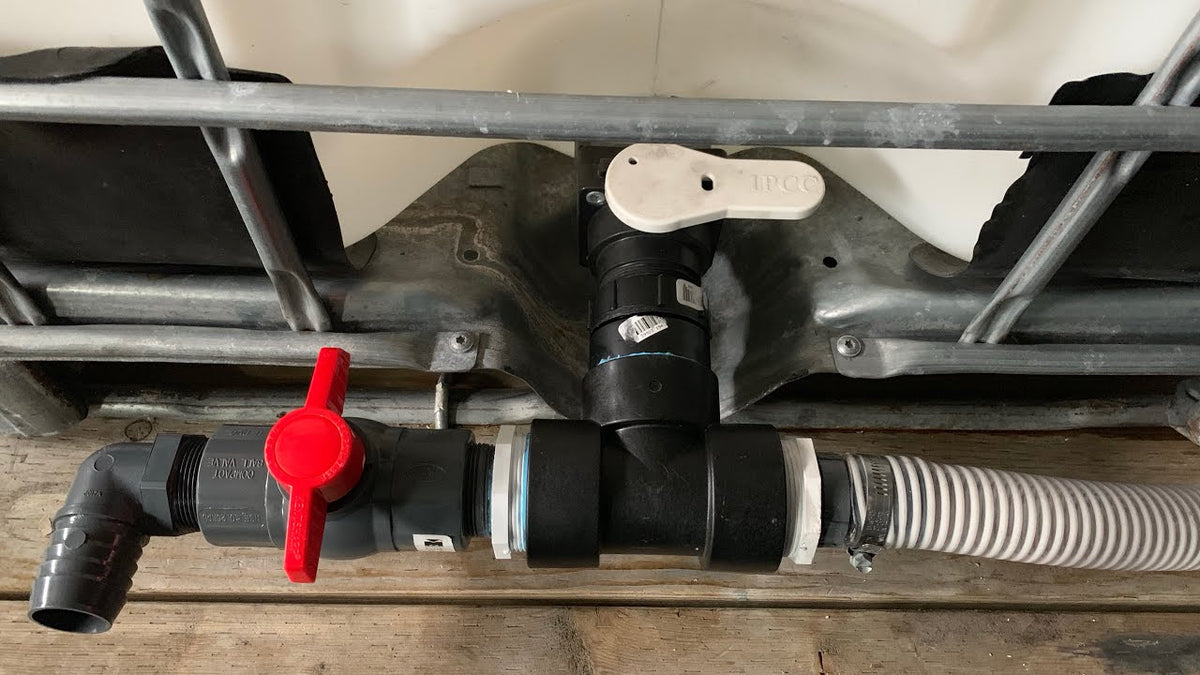
An IBC tote is the cheapest way to carry a lot of water, and plumbing one badly is the fastest way to starve a pressure washer. We ran a tote on the side of a trailer during our washing years, threw a setup together in a hurry the first season, and re-plumbed it properly the following one. This is the good version, and the bad one, so you can skip a step.
The layout
This is for a tote sitting side-on to the trailer rather than facing forward. Working from the tank outward:
- Two inches out of the tote into a collar.
- A two inch tee, reduced to an inch and a half.
- A short threaded nipple into the ball valve.
- An inch and a half barb into 1.5 inch crushproof tubing.
- A Banjo filter in the run, positioned so the screen cleans out from the top without breaking the line apart.
- Straight to the pressure washer inlet.
The third leg of that tee is a drain. Ours pointed out to the side, which works but empties onto the traffic side of the road — worth turning down and through the deck if you are building from scratch.
Pipe dope on every connection
Not for the water. For the air. A threaded joint that weeps a little water is a nuisance; one that draws air on the suction side will cavitate your pump, and cavitation is what kills pumps. Dope the threads even on the low-pressure side.
The 90-degree argument
People will tell you a 90-degree turn coming out of the tank is a mistake. It depends entirely on what size you are running.
At two inches out of the tank, two inches around the turn, and an inch and a half all the way to the machine, that 90 is not restricting anything — plenty of contractors feed an 8 GPM machine through a single inch line and get away with it. Our run is oversized at every point.
If you are coming out of the tank at 3/4 inch or 1 inch, that advice flips completely. At those sizes every 90, every reducer and every odd turn costs you, and a starved pump is a rebuilt pump. Size the line generously and the geometry stops mattering.
What we got wrong the first time
The original setup had a slip connection that was not properly threaded or clamped. It pulled apart mid-job once while the tank was draining, and the first sign of trouble was the pressure washer running out of water. We bungee-corded it for the rest of the season, which is exactly the kind of fix that works right up until it doesn't.
If a joint on your suction side is held together by friction and hope, replace it before the season starts.
The trick for getting tubing onto barbs
Crushproof tubing does not want to go over a 1.5 inch barb cold. Two ways to fix that:
- A heat gun. A basic one is about twenty dollars. Heat the end of the tubing evenly, working around it rather than straight at one spot — the lip heats more slowly than the wall does. A little soap on the barb and it slides on.
- Boiling water. No heat gun, same result. Dip the end of the tubing in a pot of boiling water for a few seconds and fit it immediately.
Then clamp it properly. We use fully stainless clamps including the screw — a plated screw on a rig that sees chemical will rust, seize, and stop being re-tightenable.
Parts
Shop fittings and plumbing, ball valves, plumbing hose and kits, hose clamps and buffer and chemical tanks. If you would rather not spend a weekend with a box of wrong-sized fittings — and we did, twice — our builds come plumbed and tested.


