



The short answer
A pressure washing skid built the right way comes down to five things: a frame that will not crack, a layout you plan before you mount anything, a pressure washer plumbed so nothing traps pressure or starves for water, electrical that is sized for the load, and a soft wash system built for the pressure it actually runs at. Get those five right and the skid will outlast the truck. Skip any one of them and you will be fixing it in the field.
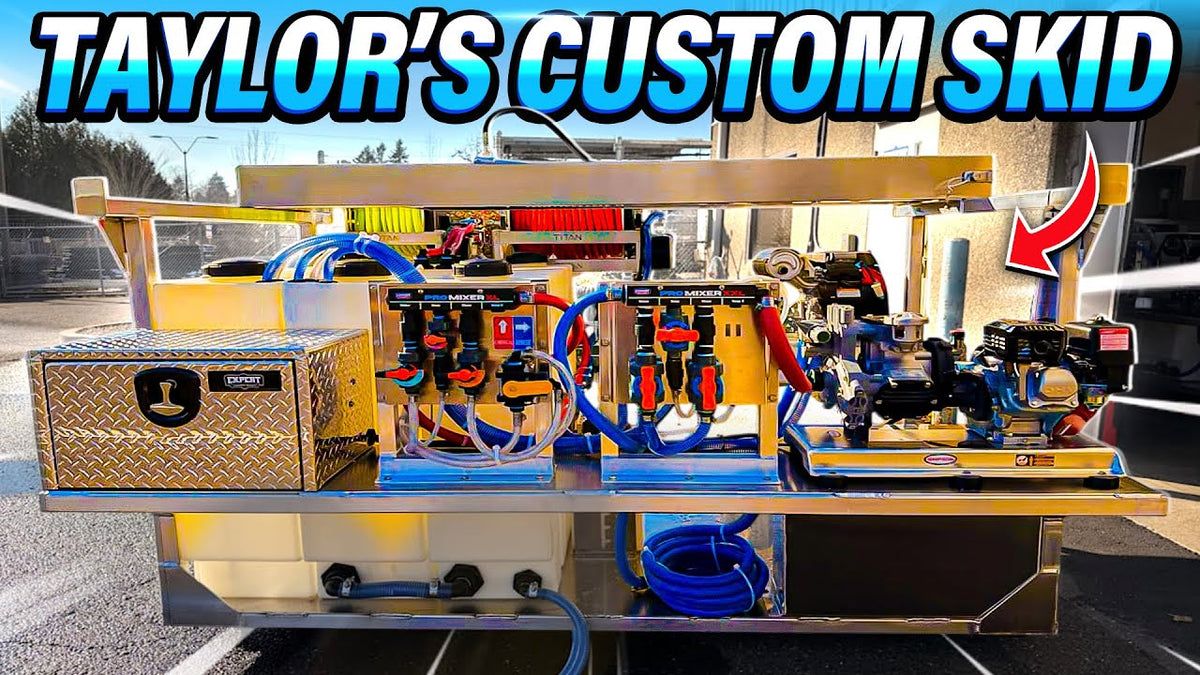
This guide walks through each step using one of our 8 ft truck skids as the example: an 8 GPM gear drive machine, a gas soft wash system and a 12V soft wash system side by side, four electric reels, and a FlowPro downstream system. It is a fully custom build, so it shows most of the decisions you will face. Whether you build your own skid or have us build one, this is the checklist.
Watch: the 8 ft skid this guide is built around
Tim walks the whole skid before it ships: the gear drive pressure washer and relocated unloader, the custom fuel tank feeding both engines, the two soft wash mixers, the plumbing under the deck, the surface cleaner rack, hose and gun choices, and the battery box. The back half of the video is a shop tour with an Ultimate Mini, a four-tank 8 ft "low boy" skid, a service-body skid, and a 5x8 enclosed trailer, which is useful for seeing how the same principles scale up and down.
Step 1: Start with a frame that will not crack
Everything else on the skid is only as good as what it is bolted to, so this is where you do not cut corners. Our frames are 1/4" aircraft-grade 5052 aluminum, fully welded, gusseted at every corner and double-braced under the shelves. Most builders use 1/8" and bolt it together. We covered why that matters in Are Custom Pressure Washing Skids Actually Worth It? and why 5052 aluminum beats steel, wood and poly in Skid Materials Compared.
Two frame-level decisions that get overlooked:
- Tank straps. Tanks full of liquid work loose over time and it is one of the most common problems we see on skids that come through the shop. Every tank on our builds gets a heavy-duty strap, and the soap tank gets a one-piece strap that wraps the tank and leaves the gallon markings visible. On the 5x8 trailer in the video we even mount components to the tank straps.
- Split your water into separate tanks. The 8 ft low boy in the video runs three water tanks tied together underneath with Banjo fittings and full-stainless clamps, so they function as one supply. The bonus is that the tank walls act as natural baffles, so you do not get one big slug of water sloshing every time you brake.
Step 2: Plan the layout before you mount anything
The difference between a skid you can service and a skid you dread working on is decided before the first hole is drilled. Most people mount the big pieces first and then run hose wherever it fits. That is how you end up with a junked-up base, hoses rubbing on each other, and a leak you cannot reach.
Map the plumbing first. On the 8 ft build in the video, every water line comes off the tanks into one manifold we call the tree, then branches out to the mixers and the pressure washer. The gas soft wash bypass line is coiled neatly under the deck instead of snaking around the base. Even with two complete soft wash systems and a pressure washer on one skid, there is still real bed space left over, and you can see and reach every fitting.
A few layout rules we follow on every build:
- Reels where you pull from. Four Titan electric reels on this skid, two 18" and two 12", stacked on stainless steel stacking kits so they do not eat deck space.
- The surface cleaner gets a home. A locking stainless rack with stainless hinges holds the 19" Whisper Wash Classic. On an 8 ft skid the rack also gives you a 16" x 16" storage pocket for a backup pressure hose.
- Keep the battery and soap tank reachable. On a traditional layout the soap tank rides in the skid. On the Ultimate Mini in the video we moved the battery and soap tank up top to make room for an extra reel. Either works, as long as you can get to them.
- Leave yourself service access. Dump valves on both sides (1" drain valves on this build), a bypass you can see, and a battery you can charge without opening the box.
Step 3: The pressure washer and how you plumb it
Start with a gear drive machine. The skid in the video runs one of our custom-built 8 GPM gear drive units with a Honda GX690 key start and a General pump. If you are not sure what size you need, 4 GPM vs. 5.5 GPM vs. 8 GPM walks through it.
Get the unloader off the pump. We run a Pulsar flow-sensitive unloader, mounted on its own block with 1/2" line instead of hanging off the pump head. Two reasons: it does not trap pressure in the line, so you do not get that violent jerk in your hand every time you pull the trigger, and hose, fittings and the unloader itself last a lot longer without that constant pressure spike. We go deeper on this in Block-Mounted Unloaders.
One fuel tank for everything. This build has a custom 13-gallon fuel tank with a rollover valve so it can breathe. The pressure washer pulls from it, and so does the gas soft wash engine through a fuel delete kit, which replaces the small tank that comes on the pump engine. One tank to fill, no cans.
Filter every drop going into the machine. All water feeding the pressure washer passes through a strainer filter. Dirty water is the fastest way to kill a pump and a common cause of low water flow.
Feed it enough water. The garden hose reel carries 100 ft of 3/4" Flexzilla, not 5/8", because the larger diameter fills your tanks faster. This skid also has a second water port straight into the buffer tank, so you can bypass the reel or run two garden lines when the gas soft wash and the pressure washer are both pulling. There is a hose reel whip line on the garden reel too; here is why.
Hose and fittings. FierceJet one-wire pressure hose: 4,250 PSI working pressure, 12,750 PSI burst, rated for hot water to 311°F, gray and non-marking. Two-wire is nearly indestructible but heavy; one-wire is the balance of weight and durability we land on. A Mosmatic ball-valve swivel, stainless steel fittings, and stainless quick connects everywhere, including the pressure washer whip line so you can move it from the reel to the FlowPro in seconds. Those details cost more. They are also why the skid still works in five years.
Downstreaming. The FlowPro Gen 5 remote downstream system is mounted on the deck with a rinse valve, so instead of pulling bleach into the injector you can flip it to water and flush the injector clean. The Gen 5 remote can also control other 12V accessories on the skid. Full walkthrough in How to Use the FlowPro Remote Control Downstream System.
Step 4: Electrical sized for the load
A skid with electric reels, a 12V soft wash pump, a FlowPro and a remote rinse valve is pulling real current, and most of it runs off the same battery. This is where a lot of DIY skids fall apart, because the wiring is whatever was on the shelf at the hardware store.
- Battery. A marine-grade battery in a proper box. Our EPW battery box has a charging port built into the lid, so you plug in without opening the box, and a NOCO Genius 5 charger inside keeps it topped up between jobs.
- Wiring. Upsized, pure-stranded marine-grade copper, not the filler-core wire sold by the spool at department stores. Long runs out to reels and pumps lose voltage fast on cheap wire. Every circuit is fused for the amps it actually draws.
- Switches you can trust. A heavy-duty on/off switch for the FloJet soft wash pump, a labeled switch box for the gas soft wash rinse valve, and the FlowPro remote for downstreaming. Mount them where you stand when you are working, not where they were easiest to wire.
- Charging. If you run your soft wash and reels off the same battery, the pressure washer's charging system has to keep up. Our custom-built machines run an upgraded charging system for that reason.
If you are building your own, the rig maintenance guide has the electrical checks we do on every build.
Step 5: A soft wash system built for the pressure it runs at
The skid in the video has two independent soft wash systems because the customer asked for both: a 12V system and a gas P40. That makes it a useful comparison, because the two are not built the same way and should not be.
12V side. A FloJet pump with a heavy-duty on/off switch, feeding our Pro Mixer XL. The mixer has a rinse valve, which lets you pull water back through the bleach line and flush the whole mixer out at the end of the day. Bleach sitting in a mixer overnight is what eats check valves and metering valves. 1/2" soft wash hose on the reel. If you are building this side yourself, read 12V Soft Wash Pump Setup: Why Most of Them Die Early first.
Gas side. A new-style P40 feeding our Pro Mixer XXL with larger Hayward metering valves. A gas system can push up to 300 PSI where a 12V system is rated around 70, so everything on this side is built heavier:
- Every hose connection is double-clamped. Gas soft wash systems are famous for leaks, and a single clamp at 300 PSI is a leak waiting to happen.
- A bypass line recirculates the mix back to the tank when you are off the gun, so the pump is not deadheading.
- The rinse function is a remote-controlled valve on a switch box. Hit the switch and it swaps the bleach pickup to water and shuts off the soap at the same time.
- 5/8" soft wash hose, and a WaterBoss 750 Soft Wash Special gun, which is the gun we put on every gas soft wash system we build. It comes with a swivel and a few upgraded parts over the standard WaterBoss.
Both sides. Two soap lines, one per system, from a strapped-in soap tank. No cheap import mixing valves on either mixer; we spec Hayward valves and check valves with a Hastelloy spring, which holds up to sodium hypochlorite far longer than a stainless spring. How a Soft Wash Mixing System Actually Works explains what each of those parts is doing.
The mistakes that cost people money
Most of the skids we repair or rebuild failed for one of the same handful of reasons. None of them are exotic.
- Mounting first, plumbing second. The base gets junked up, hoses chafe, and you cannot reach the fitting that is leaking. Plan the tree and the bypass routing before anything is bolted down.
- Bolting the frame together. Bolted shelves transfer every bump into the fasteners. We have seen Grade 8 bolts snap under a machine. Weld it.
- Hanging the unloader off the pump. Trapped pressure, trigger kick, and a short life for the unloader and hose. Put it on its own block with 1/2" line.
- Starving the machine for water. A 5/8" garden hose and no second feed port will not keep up with an 8 GPM machine and a gas soft wash system running at the same time. Run 3/4" and give yourself a second inlet.
- Building the gas soft wash like a 12V. Single clamps, light hose and no bypass are fine at 70 PSI. At 300 PSI they leak, then they fail.
- Skipping the rinse valve. Bleach left in the mixer and lines is what kills check valves and metering valves. A rinse valve costs a fraction of the parts it saves.
- No filter ahead of the pump. Every gallon into the pressure washer should go through a strainer.
- Cheap tank straps, or none. Tanks working loose under liquid weight is one of the most common problems we see on skids that come in.
- Hardware-store wire and fittings. Undersized wire, plated clamps and import valves all fail early. Marine-grade wire, full-stainless clamps, and quality valves cost a little more once.
- Buying for a budget instead of a job. A skid built to a newbie price point is rebuilt within a couple of seasons. Build it, or buy it, for the work you plan to do.
Build it yourself, or have us build it
If you are building your own skid, every part on the one in this video is something we stock: the Pro Mixer XL and XXL, FloJet and gas soft wash pumps, FierceJet hose, the WaterBoss 750 Soft Wash Special, Mosmatic swivels, stainless quick connects and clamps, tank straps, and the FlowPro. Local customers can pick up a bare skid at the shop or order a custom size. Everything else ships from expertpowerwash.com.
If you would rather have it built, we build skids for professionals and ship them fully assembled across the country. Pricing for our standard builds is on the website. For a custom build like the one in the video, the next step is a discovery call. We schedule those on purpose: it sets aside dedicated time to talk through your truck, your services and your budget, and it keeps us from guessing at what you need. You will talk with Tim or Kristina, and both of us spent years with a gun in our hands before we started building equipment.
Two things that come with a build from us: you are welcome to visit the shop in Oregon City and put your hands on the equipment before you buy, and our two-day soft wash class (one day classroom, one day hands-on) is included free with an equipment purchase.
Book a free discovery call or browse our skid builds.
Frequently asked questions
What size skid do I need?
It depends on your truck bed and your machine. An 8 ft skid like the one in the video fits a full-size long bed and leaves room for two soft wash systems and four reels. A 6.5 ft skid fits a standard bed; we walk one in Inside a 6.5 ft Pressure Washing Skid Build. The Ultimate Mini is for smaller trucks and smaller budgets, built around a 5.5 GPM gear drive machine.
How much water and bleach should the tanks hold?
The 8 ft skid in the video carries 200 gallons of water and 100 gallons of bleach for an 8 GPM machine with gas soft wash. The Ultimate Mini runs 55 and 55. The 5x8 trailer in the shop tour runs 100 and 100 behind a 5.5 GPM machine, which is plenty for that size. Match water to GPM and how far you are from a fill.
12V or gas soft wash?
A 12V system is simpler, cheaper and fine for most house and roof work. Gas is for higher volume and longer reach, and it has to be built heavier because of the pressure. Plenty of customers run 12V only. The skid in the video has both because the customer wanted two independent systems.
Do I need a rinse valve?
Yes, on every mixer. It is the cheapest insurance on the skid.
What pressure hose should I use?
One-wire FierceJet is our default: 4,250 PSI working pressure, hot water rated, gray and non-marking, light enough to drag all day. Two-wire is tougher but noticeably heavier.
Can I buy the parts and build it myself?
Yes. Everything on this skid is in our store and online. If it is not in the budget to have us build the whole thing, buying the right parts still saves you from rebuilding later.
How do I get a price on a custom build?
Standard build pricing is on the website. For a custom skid, book a discovery call so we can spec it properly.
Expert Power Wash
13896 S Fir St Suite B, Oregon City, OR
Call the shop: 503-403-6185 (calls only, no texts)
Monday through Thursday, 8am to 4pm Pacific
Tim@expertpowerwash.com


